A Lime Paint Recipe

For years I've wanted to try lime paint, and lime wash I discovered these mediums while researching historic and natural paint recipes when I created Old Barn Milk Paint. Lime wash is one of the oldest paints known to man dating back to ancient Egypt, and widely used to this day. Today I'm sharing a Lime Paint recipe that I created and love. Lime paint is not a precise formula, you can adjust the measurements as needed.

Lime Paint is well suited for porous surfaces, like brick, stone, cement, and gypsum and earth plasters. If your surface is previously painted, or is drywall Lime Paint will not mask unwanted variables in the surface (joint lines in drywall, patches, and filled holes) you'll want to prime your walls with a Lime Paint Primer, or apply a water-based drywall primer. I made my own Lime Paint Primer by adding casein to my initial coat of paint, but I do notice a little bit of ghosting in the final application of Lime Paint. Next time I will apply two coats of the primer.
I mentioned lime wash above and wanted to touch on the difference in the two. Lime Paint is made with hydraulic lime and lime wash is made with lime putty and takes several coats to create your finish. Both paints are breathable, meaning they provide a vapor-permeable finish which allows buildings to breathe eliminating dampness, mold, and condensation, they are also inflammable, solvent and VOC free. These paints also have virtually no odor, they have an earthy kind of smell, but I would swear that when you paint a room it smells purified, it's hard to put into words, but the air feels cleaner to me.

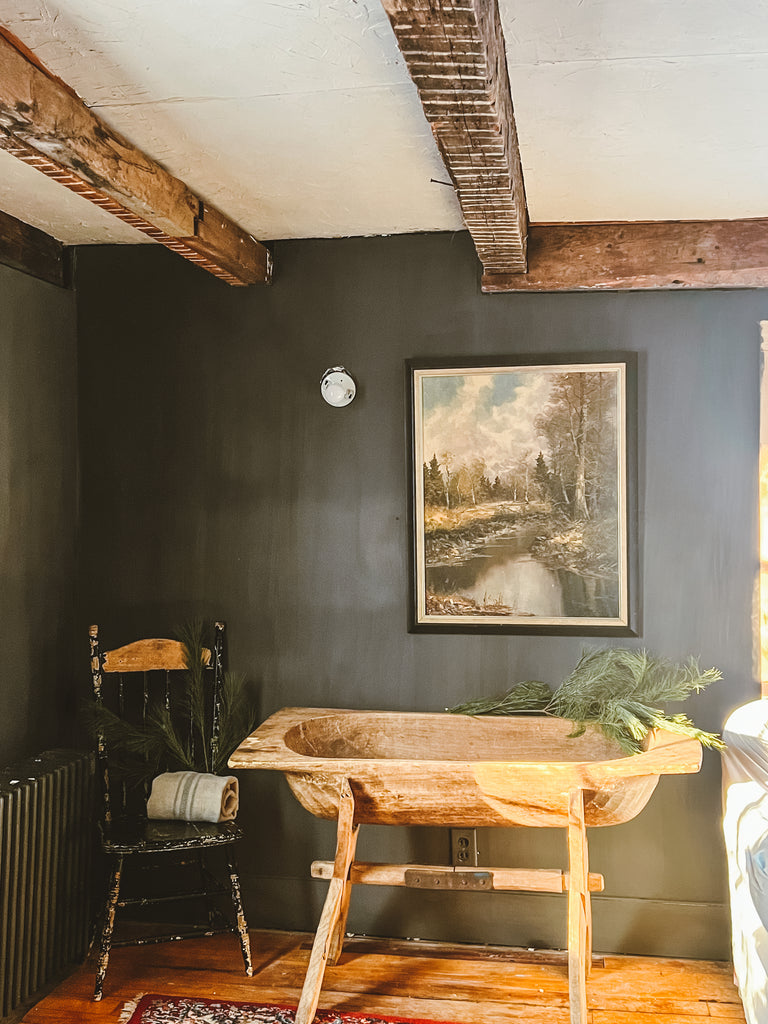
I'm so happy to have a platform to share my love of natural paints and to feel secure enough to share these recipes I've created based of historic recipes I've spent years researching and storing for later testing. Lime Paint is now one of my favorite coatings for walls. Much like a Milk Painted finish, Lime Paint has life to it, there's beautiful movement in the pigments, you can create texture and "patterns" simply by the way you apply the paint. Drag Down, and Cloud are my favorite techniques to apply Lime Paint. I'll discuss application below in the recipe. As many of you saw on my social media Lime Painting is a very artistic finish. You have to just trust the process and keep going. It's easy to get discouraged in the beginning stages of application and as you see it drying it's a little scary, I admit. But the end result is stunning! I felt like I was working on a masterpiece as I was painting and it was FUN!
See our instagram reel on applying Lime Paint
Below is the recipe I developed for Lime Paint and used in our parlor, you can add natural clays, casein, animal fats, or boiled linseed oil to create your own recipe that works for you. I added Kaolin Clay because it added bulk to the paint (it's still a very thin paint, nothing like thick latex paint) You can omit the Kaolin Clay and use Lime, natural pigments, and water for a traditional lime paint recipe. I'm just sharing what worked for me when painting over drywall.
Lime Paint
INGREDIENTS:
2 1/4 pounds High Calcium Hydrated Lime
3 quarts water
1 pound Kaolin Clay
3 ounces lime-tolerant natural pigment (note: darker colors like black take more pigment up to 6oz)
* It's important to wear protective glasses and a mask when working with dried lime and Kaolin Clay. It's highly caustic in dry form, once mixed with water it is 100% non-toxic.
MIXING:
In a small container mix Natural Pigment with 1 1/2 cups lukewarm water
In a large 5 gallon bucket add Lime, Kaolin Clay, and slowly add remaining water
Mix with a paint and mud attachment for your drill, or use a large whisk. Stir continuously until the consistency is similar to light cream or whole milk.
Add pigment and water mixture to Lime & Clay mixture.
Mix until pigment is completely dispersed in the Lime & Clay
APPLICATION:
Using a large, long bristle masonry brush apply in thin, even strokes maintaining a wet edge. You should mist your wall with water for easier application. I also have a second smaller bucket with water that I will dip my brush in and really spread out the paint extending it as far as it will go. You don't want to over apply Lime Paint as it can become powdery when dry. The color becomes lighter as it dries, apply two to three coats waiting 24 hours between coats. This is an important step because the paint cures and bonds with the wall during this 24 hour time. When applying additional coats you'll want to mist your walls to ease application.
There are several techniques to applying lime paint and lime wash. No two people will have the same results as one person may have a larger brush swing, heavier hand when applying. Trust the process and trust in your own technique. I'm sharing general application techniques it's not an exact science though, and its fun to experiment with your own!
Drag Down: In all lime paint applications you want to start away from the edge and brush out the paint as far as it will extend avoiding a hard line. You can dip your brush in water shaking off excess water to really extend the paint dragging your brush down lightly to create subtle drag down lines. Do this with each coat.
Cross Hatch: Starting away from the edge create a cross hatch pattern by lightly brushing in an X pattern you can do large swinging brush strokes always spreading out the lime paint and extending it as far as it will go. Offload your brush if needed in a new area fanning out in the cross hatch pattern and blending into the previous brush strokes.
Cloud: Starting away from the edge fan outwards in a cloud shape, don't worry about being precise, this is truly like abstract artwork, and the results wont truly show until the lime paint or lime wash is completely dry. Trust the process. Always start a new run of paint away from the last brushing into the last run so you do not have harsh lap marks. Enjoy this, it's supposed to be fun and creative.
I had my moments during painting my first coat where I was really concerned. It took until the second coat dried for me to trust the process and my recipe. It's truly a form of self expression and I think it adds an elevated design level to any room.
If anyone is interested I can package up a kit for mixing your own Lime Paint and add it to the website, otherwise there are several websites you can order lime, kaolin clay, and natural pigments from. One of my favorites is Earth Pigments the owner, Erin is so knowledgable and equally as passionate for natural paints, I absolutely adore her, and she's just across the lake from me in Vermont!
Enjoy and if enough people are interested I will package up some Lime Paint Kits with everything you need.
xoxo Chrystal
Continue reading